


Brightspace by D2L
Brightspace is SD72's officially supported learning management system (LMS).
Contents
- Brightspace basics
- Requesting a course shell
- WCLN prepared course content
- Bulk importing students from MyEd
- Enrolling students in Brightspace individually
Brightspace Basics
View the presentation below to learn how to do the essentials in the Brightspace environment.
Requesting a course shell
Before requesting a course shell in Brightspace you will need your Principal's approval as there is a cost associated with its use.
To request a course shell, create a ticket by emailing servicedesk@sd72.bc.ca with this info:
- Confirmation that you have your principal's approval
- The name of the course you want created
- Whether you want the course to include WCLN content (see below)
WCLN prepared course content
SD72 is a member of the Western Canadian Learning Network (WCLN), a consortium of school districts that supports distance learning, alternate, and blended learning programs.
The WCLN provides Brightspace compatible content for most of the BC curriculum from grades 4 to 12. A complete list of available courses can be found here. There is no additional cost for us to access this course content.

When accessing WCLN prepared content in Brightspace for the first time, you need to make the content available to students:
- In the course, Click Content from the top menu,
- Expand any unit,
- Click any lesson with a brick icon,
- Change the “Open to Students” setting to Yes (if you can already see the course content, then it’s already been done), and
- Click the Save Changes button.
Bulk importing students from MyEd
The quickest method to enroll your students in your Brightspace courses is to import your class list from MyEd using these instructions. If you want to add single students or add a teacher to your course, see the next section.
Part 1: Exporting your class list from My Ed
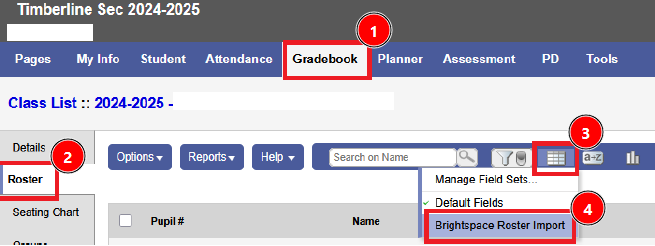
- Log into MyEd, click the "Gradebook" top tab, then select the course you'd like to import into Brightspace.
- Select the "Roster" side tab,
- Click the "Fieldset" icon, then
- Select "Brightspace Roster Import".
- Click on the Print Icon, then
- Select CSV.

Part 2: Modifying the Exported CSV file:
- This will download a file. Open the file in Excel and accept the default import options.
- To the right of the Email1 column, give column E the heading "Role". Enter a value of "Student" for all students.
- Give column F the heading "Password". Leave this column blank for all students.

- Save the document to your computer as a “csv”.
Part 3: Importing the students into your Brightspace course
- Log in to Brightspace and navigate to the course where you want to import the students.
- Select “Add Participants” > Import users from a file on your computer,
- Click Choose File > Select the CSV file we saved and edited > Click Import
- Click “Done” at the bottom.
Enrolling students in Brightspace individually
For instructions on how to export your class list from MyEd and import it into Brightspace, please refer to the below instructional document.
 | How to enroll students after your course shell is created. |
| Instructional document on how teachers and students can login. |
 | Shareable instructions for how parents can create their passwords and login. |
 | Learn more about the built in interactive lesson features in Brightspace called Creator+. |
 | Learn more about inclusive content creation in Brightspace |
